During one of my recent projects, I needed to find a new CI/CD service that could meet my needs. This service needed to be lightweight, affordable, and offer me the ability to define my workflow in code.
Enter Concourse CI. This isn’t your grandpa’s CI, Concourse CI is a free, open source CI written in Go and Elm. With all my criteria met, I decided to give it a shot and I was quickly won over.
In adopting Concourse CI, I wanted to share with you all two examples to help you get started. I’ll be splitting these examples into two parts; part one focusing on having Concourse build your Docker image from GitHub and deploying to ECR, part two being a more advanced version of this where Concourse can update your code and create pull requests.
Lets get started
What you will need
- Github access token
- ConcourseCI(https://concourse-ci.org/download.html)
- AWS ECR
Creating our resources
Councourse uses something called “resources” that are used to specify the external inputs and outputs of jobs within your Councourse pipeline. Concourse has a basic set of resources that are included, three of which we will be using for our example:
- github-release : Fetches (and creates) versions for github repositories
- docker-image : Build Docker image and pushes to a registry
- git : Checks, pulls, and pushes to a Github repository
The “name” field in this step can be anything, but just make sure when you’re setting up the job in the next step that the names match up correctly. For more information on any of the configuration of these resources, see here: https://concourse-ci.org/included-resource-types.html
resources:
- name: project-release
  type: github-release
  source:
    owner: ((github-username))
    repository: ((github-repo))
    access_token: ((github-access-token))
    release: true
    pre_release: true

- name: ecr-docker-reg
  type: docker-image
  source:
    aws_access_key_id: ((aws-token))
    aws_secret_access_key: ((aws-secret))
    repository: ((aws-repo))

- name: git-repo
  type: git
  source:
    uri: ((github-repo-uri)
    branch: master
    username: ((github-username))
    password: ((github-access-token))
Creating our job
To get our job going, we need to create a “plan” that will outline the steps to take in the job. For this example, we are going to have two “get” steps and one “put” steps.
jobs:
- name: release-and-deploy
  plan:
  - get: project-release
    trigger: true
  - get: git-repo
  - put: ecr-docker-reg
    params:
      build: ./git-repo
      tag_file: ./project-release/tag
The “get” steps are specified via the names you gave them in the previous step, so in this case the “git-repo” resource will get the code from GitHub and “project-release” will specify the versioning on the project.
As for the “put” step, the “ecr-docker-reg” resource is used to push the code to the specified ECR instance.
If configured correctly, the plan will grab code from the GitHub repo, version it, and deploy it directly to the specified ECR instance.
Full pipeline yaml
At this point, you should have a YAML file that looks like the one below. Make sure that you fill out all the required fields and replace all ((variables)) with your own data.
resources:
- name: project-release
  type: github-release
  source:
    owner: ((github-username))
    repository: ((github-repo))
    access_token: ((github-access-token))
    release: true
    pre_release: true

- name: ecr-docker-reg
  type: docker-image
  source:
    aws_access_key_id: ((aws-token))
    aws_secret_access_key: ((aws-secret))
    repository: ((aws-repo))

- name: git-repo
  type: git
  source:
    uri: ((github-repo-uri)
    branch: master
    username: ((github-username))
    password: ((github-access-token))

jobs:
- name: release-and-deploy
  plan:
  - get: project-release
    trigger: true
  - get: git-repo
  - put: ecr-docker-reg
    params:
      build: ./git-repo
      tag_file: ./project-release/tag
If we now take this pipeline and put it in Concourse, our pipeline should look similar to the below diagram:
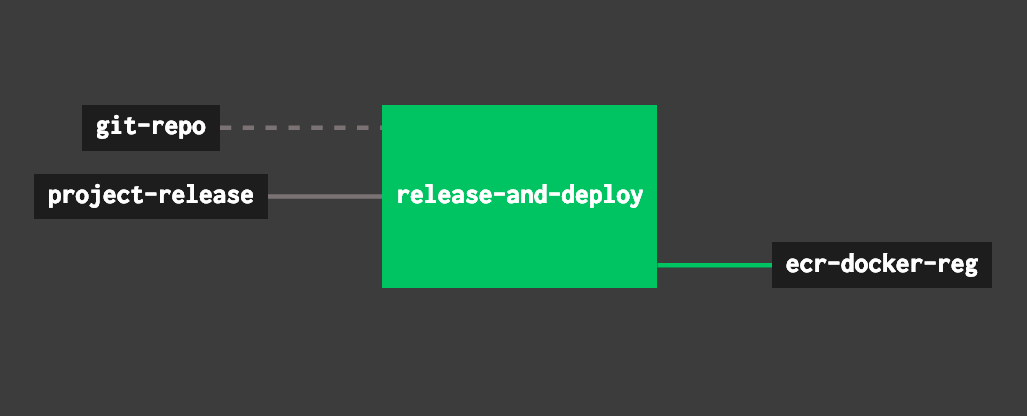
fly -t example set-pipeline -c concourse-full.yml
Overall
While this is a basic example, it will get you up and running with Concourse and familiar with how it works. In the second part of this post series, I will cover a more advanced pipeline that involves approving pull requests of release changes created by Concourse when a release is initiated from GitHub.
If you want to take a deeper dive in Concourse, here are some resources I’ve used that have helped me learn: