
Network booting has become an invaluable tool for managing and deploying systems efficiently. A versatile network booting solutions available is netboot.xyz, which allows you to boot your computer from a network server using a variety of operating systems or utilities. At its core, netboot.xyz is an elegant solution that leverages the iPXE project to offer a user-friendly, BIOS-integrated menu, enabling seamless selection from a plethora of operating systems, versions, and bootable utilities - all from a singular, network-based tool. This guide will walk you through setting up netboot.xyz on any device with docker, utilizing the robust linuxserver/netbootxyz Docker image.
Setting Up Your Environment
Your hardware may vary but at a minimum you will need the following:
Requirements:
- A Device to host netboot (in my case a virtual machine)
- A device for booting (in this case, a Intel NUC)
- A router or switch with DHCP capabilities (UDM Pro is used here)
Installation on the netboot host:
- Docker Image: We’re using the linuxserver.io Docker image for netboot.xyz, which is
well-maintained and regularly
updated. You can find the image details on [Fleet by LinuxServer.io](Fleet by LinuxServer.io). At the time of setup,
we used the
latest tagcorresponding to versionv0.7.1. - Port Configuration: Ensure the following ports are properly mapped to allow for seamless operation:
Here is what a table showing what the ports are and what they map to.
| Local Port | Container Port | Type | Services |
|---|---|---|---|
| 3000 | 3000 | TCP | Web UI |
| 69 | 69 | UDP | TFTP |
| 8080 | 80 | TCP | Assets |
Here is a sample docker compose yaml.
version: "3.8"
services:
  netbootxyz:
    image: lscr.io/linuxserver/netbootxyz:latest
    container_name: netbootxyz
    environment:
      - PUID=1000
      - PGID=1000
      - TZ=Etc/UTC
      - PORT_RANGE=30000:30010 #optional
    volumes:
      - /root/config:/config
      - /root/assets:/assets #optional
    ports:
      - 3000:3000
      - 69:69/udp
      - 8080:80 #optional
    restart: unless-stopped
Once deployed you should be able access the UI on port 3000. The UI lets you view which OS images and tools are available to use. They also carry their boot files. The option to upload your own custom images and boot setups are also possible.
Network Configuration on UDM Pro:
Firewalls and Groups: This portion may be entirely optional or not needed in your specific network setup.
In my particular setup I have multiple vlans that do not have access to talk to one another. This means I need to setup specific firewall access so that netboot on its particular port and IP is accessible for all devices.
- Port Group: Create a port group for port 69, which is the TFTP port used by netboot.xyz and operates over UDP.
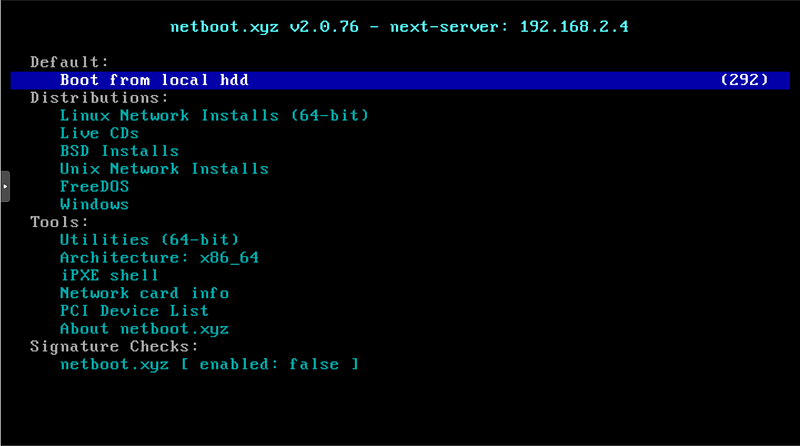
- IP Group: Define an IP group for the netboot.xyz server, in this case,
192.168.2.4. - Firewall Rule: Establish a firewall rule to allow devices in your network to communicate with the netboot.xyz server on the specified IP and port group.
DHCP Settings:
In your network’s DHCP settings, make sure to enable the network boot feature. For the boot path, you’ll want to use the
IP address of your netboot server, which in my setup is 192.168.2.4. Depending on your device’s firmware, choose
netboot.xyz.efi as the boot file for UEFI-based systems, and netboot.xyz.kpxe for those running BIOS.
It’s worth noting that if you, like me, are working with a mix of UEFI and BIOS devices, you might need to dive into your UDM Pro via SSH to more elegantly manage which boot file gets served based on the device’s architecture. Some network setups allow the specification of multiple boot files tailored to the architecture of the connecting devices, making this process smoother.
Configuration on the Client Side(NUC):
BIOS Settings: Access the BIOS of your NUC (or any client device intended for network boot) and make the following adjustments:
- Enable UEFI/PXE boot to allow for network booting
- Disable ‘Network Boot Last’ to prioritize network booting
- Disable Secure Boot to avoid conflicts with network booting
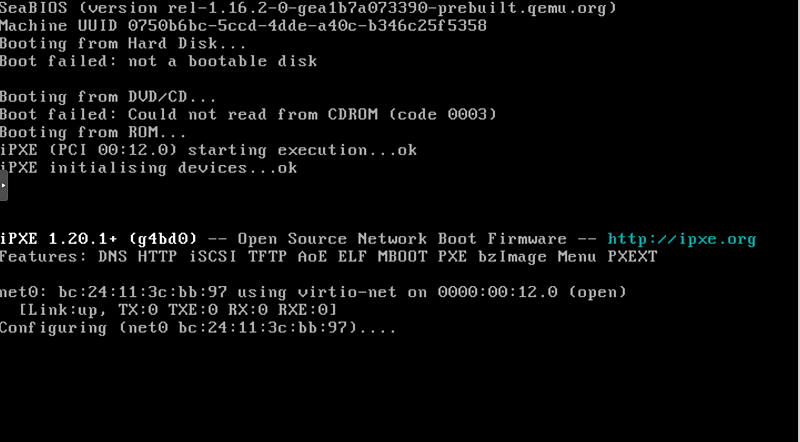
With these settings in place when you reboot your server it should now go out to the DHCP server and request for a netboot image. The screen should look similar to this
Validating Requests
To ensure that the TFTP requests are being received correctly by the hardware hosting netboot, use the tcmdumpcommand to monitor traffic on port 69.
Here’s an example output that indicates successful request receptions:
bash-4.4# tcpdump port 69
tcpdump: verbose output suppressed, use -v or -vv for full protocol decode
listening on eth0, link-type EN10MB (Ethernet), capture size 262144 bytes
21:50:06.110306 IP hostname > dym.tftp:  58 RRQ "netboot.xyz.efi" octet tsize 0 blksize 1468 windowsize 4
21:50:10.152681 IP hostname > dym.tftp:  58 RRQ "netboot.xyz.efi" octet tsize 0 blksize 1468 windowsize 4
21:50:14.204180 IP hostname > dym.tftp:  58 RRQ "netboot.xyz.efi" octet tsize 0 blksize 1468 windowsize 4
21:50:18.256737 IP hostname > dym.tftp:  58 RRQ "netboot.xyz.efi" octet tsize 0 blksize 1468 windowsize 4
21:50:22.308318 IP hostname > dym.tftp:  58 RRQ "netboot.xyz.efi" octet tsize 0 blksize 1468 windowsize 4
21:50:26.359845 IP hostname > dym.tftp:  58 RRQ "netboot.xyz.efi" octet tsize 0 blksize 1468 windowsize 4
21:50:34.467892 IP hostname > dym.tftp:  58 RRQ "netboot.xyz.efi" octet tsize 0 blksize 1468 windowsize 4
21:50:38.515796 IP hostname > dym.tftp:  58 RRQ "netboot.xyz.efi" octet tsize 0 blksize 1468 windowsize 4
21:50:42.567334 IP hostname > dym.tftp:  58 RRQ "netboot.xyz.efi" octet tsize 0 blksize 1468 windowsize 4
21:50:46.618858 IP hostname > dym.tftp:  58 RRQ "netboot.xyz.efi" octet tsize 0 blksize 1468 windowsize 4
Conclusion
In wrapping up, adopting netboot.xyz, wether in your homelab, on-premise environment, or in the cloud, is a game-changer. It simplifies what used to be complex, making the deployment of various systems a breeze. With netboot.xyz, you’re not just managing systems; you’re crafting a more efficient, streamlined deployment experience. So, gear up, dive in, and let netboot.xyz revolutionize your setup.
Happy booting!