Overview
What is Traefik? Traefik is a load balancer and HTTP reverse proxy that makes working with microservices and integrating with your infrastructure seamless.
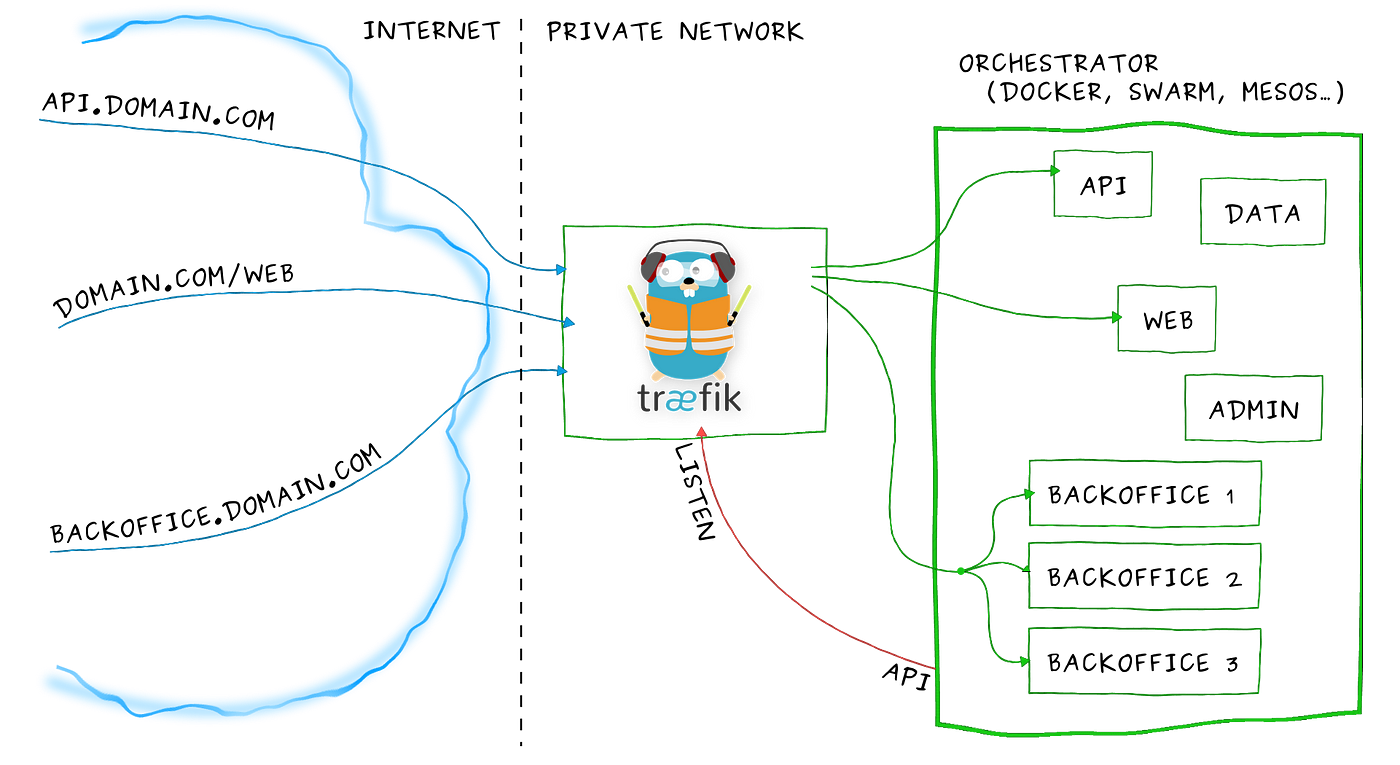
As you you see above Traefik will allow you to define public routes that the internet can access which will then get routed to a docker container. These publicly accessible routes are called “frontend-rules” which get routed to “backends”.
What will you learn?
By the end of this article you will learn how to setup Traefik to route http traffic to your Docker containers and have these calls go through HTTPS with Lets Encrypt. Getting started
You are going to need a web server that has Docker running on it. I deployed a high frequency instance on Vultr with Docker already preinstalled.
Information about the high frequency instances and the Docker one click deploy here:
NOTE You can go with whichever cloud provider you wish. You will just need docker and docker-compose installed.
Initial Setup
Before we get into the nitty gritty with Traefik there are a few things we have to do first.
Install Docker-Compose
This step is required because the Vultr one-click deploy of Docker does not come with docker-compose preinstalled. Install docker-compose run the following command.
# This will pull the appropriate packge for your given linux distro
sudo curl -L "https://github.com/docker/compose/releases/download/1.24.1/docker-compose-$(uname -s)-$(uname -m)" -o /usr/local/bin/docker-compose

# Give the binary exeecutable persmissions
sudo chmod +x /usr/local/bin/docker-compose

# This next command may be neccessary if running docker-compose doesn't work after running the first two commands since you may need to create a symbolic link to /user/bin
sudo ln -s /usr/local/bin/docker-compose /usr/bin/docker-compose
Now if you run a docker-compose version you will get output similar to this.
~# docker-compose version
docker-compose version 1.24.1, build 4667896b
docker-py version: 3.7.3
CPython version: 3.6.8
OpenSSL version: OpenSSL 1.1.0j  20 Nov 2018
Note If you go with another Cloud Provider other then Vultr and chose a “One click Docker deploy” solution; Docker-compose may already be installed.
Docker Network
If we want to be able to have our Docker containers speak with each other over TCP they need to share a network. So to facilitate this we will be creating a Docker network. Setting this up is straight forward with the single command.
docker network create web
Traefik folder structure
We reach the final part of our initial setup. We will need to create a directory where Traefik and a few necessary files.
# Create the directory where all the traefik files will live
mkdir -p /opt/traefik

# Create 3 files
touch /opt/traefik/docker-compose.yml
touch /opt/traefik/acme.json && chmod 600 /opt/traefik/acme.json
touch /opt/traefik/traefik.toml
So what are those 3 empty files we created?
- docker-compose.yml : This is were we will define our docker containers along with Traefik and define how to route to all of these containers.
- acme.json : This file will store our SSL ceritifcates that Lets Encrypt will supply us
- traefik.toml : This is the configuration file for Traefik
Domain name
In order for Lets Encrypt to work you will need to add a domain name to your web server.
Traefik Setup
We are now going to setup Traefik to route its native dashboard feature as a subdomain to dashboard.your-domain.com while enabled HTTP authentication. It is not recommend to use this dashboard feature in production unless it is secured by authentication and authorizations.
Docker
Lets start with just adding the Traefik container to our compose file :
version: '2'

services:
  traefik:
    image: traefik:1.7.12
    restart: always
    ports:
      - 80:80
      - 443:443
    networks:
      - web
    volumes:
      - /var/run/docker.sock:/var/run/docker.sock
      - /opt/traefik/traefik.toml:/traefik.toml
      - /opt/traefik/acme.json:/acme.json
    container_name: traefik
    environment:
      - VULTR_API_KEY={YOUR VULTR API KEY}
    labels:
      - "traefik.enable=true"
      - "traefik.backend=dashboard"
      - "traefik.frontend.rule=Host:dashboard.your-domain.com"
      - "traefik.port=8083"
networks:
  web:
    external: true
Lets Break down some sections of this docker-compose.yml
Image: Couple of things to note here. At the time of writing this traefik 1.7.12 was the latest release with 2.0.0 being in beta. It may be wise to check what the latest stable release of Traefik is by visiting.
Ports: Traefik will only listen on port 80 and 443.
Networks: We are attaching this container to the Docker network we created earlier.
Volumes: You can see we are mounting traefik.tml along with acme.json into the container. In addition to those we are also mounting the Docker socket into the container. This will allow the Traefik container to listen in on events and reconfigure its configurations when containers are added or removed.
Container Name: Giving this container a static name.
Environment: Since we are using Traefik to have Lets Encrypt give us SSL we will need to supply our cloud providers API key. You will need to see what environment variable is required for the cloud provider you end up going with.
Labels:
With Docker Labels we can tell Traefik how to create its routing configuration.
- “traefik.enable=true” : Enables this container in Traefik
- “traefik.backend=dashboard” : This is used primarly for the Traefik dashboard so we need to tell Traefik to use the “backend” of dashboard
- “traefik.frontend.rule=Host:dashboard.yourdomain.com” : Defines the public route that Traefik will route to
- “traefik.port=8083” : Tell Treafik to route to port 8083 on the container
Traefik Configuration
Now lets update our traefik.toml file :
debug = false

logLevel = "ERROR"
defaultEntryPoints = ["https","http"]

[entryPoints]
  [entryPoints.http]
  address = ":80"
    [entryPoints.http.redirect]
    entryPoint = "https"
  [entryPoints.https]
  address = ":443"
  [entryPoints.https.tls]
  [entryPoints.admin]
  address = ":8083"
    [entryPoints.admin.auth]
    [entryPoints.admin.auth.basic]
      users = [
        "test:$apr1$K8RmlfSZ$zOnm8Bdc7ohhbFVqUVkny."
      ]
[retry]

[api]
entryPoint = "admin"
dashboard = true

[docker]
endpoint = "unix:///var/run/docker.sock"
domain = "yourdomain.org"
watch = true
exposedByDefault = false

[acme]
email = "YOUR EMAIL ADDRESS"
entryPoint = "https"
storage = "/acme.json"
caServer = "https://acme-v02.api.letsencrypt.org/directory"
onHostRule = true
  [acme.dnsChallenge]
  provider = "vultr"
  delayBeforeCheck = 0
  [[acme.domains]]
   main = "yourdomain.com"
  [[acme.domains]]
   main = "*.yourdomain.com"
First look at this file it can be a bit daunting. So lets review it
EntryPoints: This is were we define the network entry points into Traefik. We have two entryPoints defined http and https.
Also we are defining a foreced redirect to https here.
[entryPoints.http.redirect]
    entryPoint = "https"
Below that you will see us setting up our entryPoint for the dashboard “api” and setting a basic HTTP Auth.
 [entryPoints.admin]
  address = ":8083"
    [entryPoints.admin.auth]
    [entryPoints.admin.auth.basic]
      users = [
        "test:$apr1$K8RmlfSZ$zOnm8Bdc7ohhbFVqUVkny."
      ]
In the entryPoints.admin.auth.basic you will see a are defining our username & passwords in an array to the users variable. The one in the example is test / test. It is strongly recommend that you create your own password using a tool such as htpasswd.
There are other ways to setup authentication with Traefik to read about those you can follow this link
API: Here we are creating a new block called “api”. Inside you will see we have an entryPoint that was used in the “http” blocks where we setup the route.
Docker: Inform Traefik to listen in on the Docker socket and not to expose containers by default. Also define our domain name.
Acme: Here we define how we want to validate our domain against Lets Encrypt. Some take aways here
- We are using the DNS Challenge and defining vultr depending which cloud provider you are using you will need to adjust this accordingly.
- Define two types of SSL certs. One for the root domain and one wildcard
Bringing it all together
Up until now we have been configuring and setting everything up. To actually get traefik running we just need to run a single command within the /opt/traefik directory where the docker-compose.yml.
docker-compose up -d
This will run the compose file in a detached head. You can check the status to make sure your containers are running with.
docker cotainer:/opt/traefik# docker container ls
CONTAINER ID        IMAGE               COMMAND             CREATED             STATUS              PORTS                                      NAMES
a4f26fefa4ba        traefik:1.7.2       "/traefik"          About an hour ago   Up 8 seconds        0.0.0.0:80->80/tcp, 0.0.0.0:443->443/tcp   traefik
You can also cat acme.json and see that it is populated with your SSL certificates.
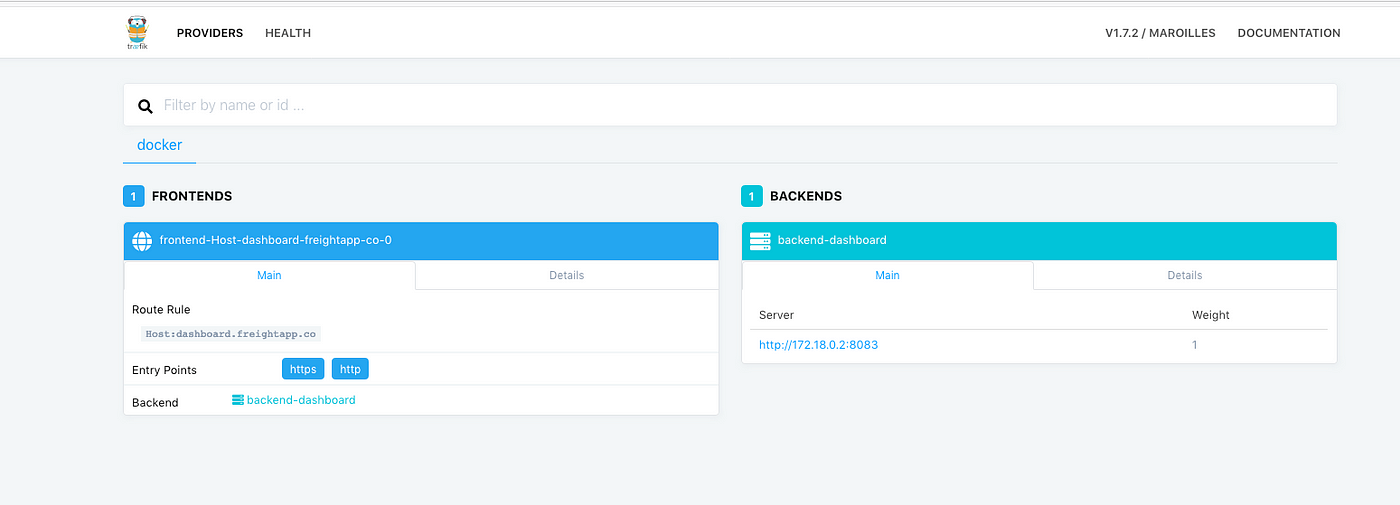
So now if you you go to dashboard.your-domain.com you will be greeted with a authentication page. Here you will need to enter your username and password that you defined in your entryPoints. Once logged you will see a page similar to this.
Wrapping up
With this post you have configured Traefik to listen in on the Docker socket and route external traffic to a internal container all on HTTPS thanks to Lets Encrypt.
This post only scratches the surface with what you can do with Traefik. There are an abundance of features that this post did not cover and I urge you to go checkout their docs page for more information.
Useful links: