
What is a service in Kubernetes
In a Kubernetes environment, you can have hundreds if not thousands of pods that are ephemeral. Whether it is because nodes are being scaled down, pod replicas being scaled down, or pods being rescheduled to a new node, the IP address of a pod is never guaranteed. The pods IP address is assigned after it has been scheduled to a specific node and before it has been booted.
Given that we are in a cloud native environment, we want the ability to scale pods horizontally. Thus it would be quite a difficult task to track all the IP addresses for all of our applications. Kubernetes has a resource type that solves this problem of ever changing pod IPs called Services. A Kubernetes service allows you to create a single constant IP address that contains an IP address for a group of pods that contain the same service. This is very useful as the service IP remains static while the pods IPs can be constantly changing. You never have to worry about not having the proper IP address.
How do services work
How does a service work? How do I configure one?
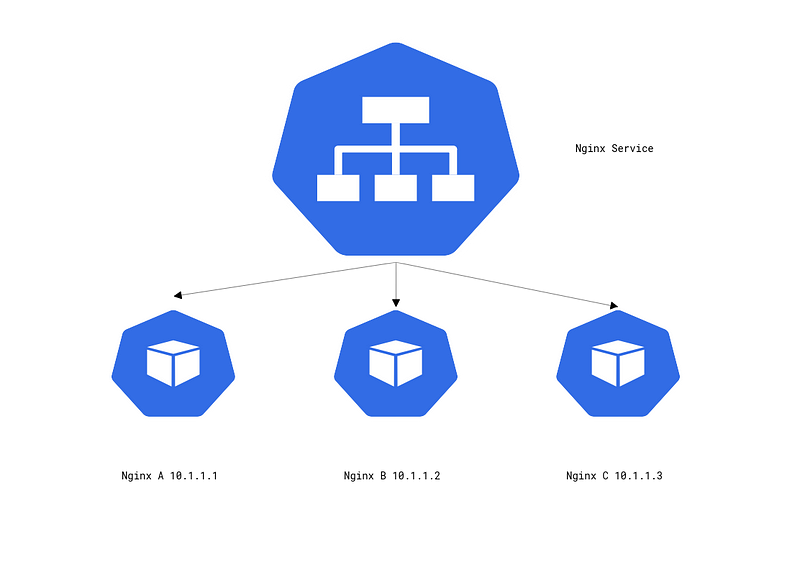
Let us start by creating a deployment with three instances of an nginx pod.
apiVersion: apps/v1
kind: Deployment
metadata:
  labels:
    app: nginx
  name: nginx
spec:
  replicas: 3
  selector:
    matchLabels:
      app: nginx
    spec:
      containers:
      - image: nginx
        name: nginx
After applying the deployment manifest we can see we have three instances of nginx running with the IPs 10.244.242.66, 10.244.242.67, 10.244.230,199. Also, take note of the labels we have assigned to these pods app=nginx this will be crucial to how the service monitors these pods.
☁  ~  kubectl get pods -owide --show-labels
NAME                    READY   STATUS    RESTARTS   AGE     IP               NODE                      LABELS
nginx-8f458dc5b-6vcxt   1/1     Running   0          2m27s   10.244.242.66    nodepool-a-95e9c8e86208   app=nginx,pod-template-hash=8f458dc5b
nginx-8f458dc5b-ktvtf   1/1     Running   0          2m27s   10.244.242.67    nodepool-a-95e9c8e86208   app=nginx,pod-template-hash=8f458dc5b
nginx-8f458dc5b-mlkwd   1/1     Running   0          2m27s   10.244.230.199   nodepool-a-11aa1dc199fa   app=nginx,pod-template-hash=8f458dc5b
Now, let us define our service manifest, which is defined below with a breakdown on what is defined.
apiVersion: v1
kind: Service
metadata:
  name: nginx
  labels:
    app: nginx
spec:
  selector:
    app: nginx
  type: ClusterIP
  ports:
  - name: 80-80
    port: 80
    protocol: TCP
    targetPort: 80
As we start to breakdown this manifest, we notice that the kind is of Service. Next, the metadata section should be familiar as it is the same as the metadata fields on other kubernetes resources. The spec section is where we define how and what our service will interact with.
The selector field. This field is where you define which pods you want this service to monitor. This is done through label matching. You will notice that this selector has a definition for app: nginx. If you remember these are the labels we had defined for our pods in the deployment manifest. With this selector definition we are stating that any pods with the labels app=nginx will be part of this service.
Next, we have the type field. This defines what kind of service we want this to be. We will dive deeper into service types later on, but for now just we have defined this as a ClusterIP.
Finally, we have the ports field. Here, we define how and where the traffic will flow through the service. Note that this field takes in an array, so you can define multiple entries.
Let’s breakdown each field within ports:
- name: You can assign a specific name to the given port entry.
- port: This is the port the service will listen on.
- targetPort: This is the port the service will forward requests to. This should match the port the pods are listening on.
- protocol: The specific protocol you wish the service to listen to and interact with.
Now that we have a basic understanding of what the service manifest does and how it interacts with pods, we deploy the manifest and inspect the service.
☁  ~  kubectl get svc
NAME         TYPE        CLUSTER-IP      EXTERNAL-IP   PORT(S)   AGE
kubernetes   ClusterIP   10.96.0.1       <none>        443/TCP   90m
nginx        ClusterIP   10.108.176.62   <none>        80/TCP    18m

☁  ~  kubectl describe svc nginx
Name:              nginx
Namespace:         default
Labels:            app=nginx
Annotations:       <none>
Selector:          app=nginx
Type:              ClusterIP
IP Family Policy:  SingleStack
IP Families:       IPv4
IP:                10.108.176.62
IPs:               10.108.176.62
Port:              80-80  80/TCP
TargetPort:        80/TCP
Endpoints:         10.244.230.199:80,10.244.242.66:80,10.244.242.67:80
Session Affinity:  None
Events:            <none>
Everything in the describe command should align up with the manifest definition expect for two fields IP and Endpoints.
The IP field defines the services IP address. This is the static IP that can be used for accessing the pods behind the service.
The Endpoints field defines the pod IPs that are currently assigned to this service. You notice that these IPs are the ones from our nginx deployment.
Before we continue on to the other services types, let’s show scaling down the nginx deployment and seeing how the service will handle this change.
☁  kubectl scale deployment/nginx --replicas 1
deployment.apps/nginx scaled

☁  kubectl get pods -owide
NAME                    READY   STATUS    RESTARTS   AGE   IP               NODE                      NOMINATED NODE   READINESS GATES
nginx-8f458dc5b-mlkwd   1/1     Running   0          43m   10.244.230.199   nodepool-a-11aa1dc199fa   <none>           <none>

☁  kubectl describe service nginx | grep Endpoints
Endpoints:         10.244.230.199:80

☁  kubectl scale deployment/nginx --replicas 5
deployment.apps/nginx scaled

☁  kubectl get pods -owide
NAME                    READY   STATUS    RESTARTS   AGE    IP               NODE                      NOMINATED NODE   READINESS GATES
nginx-8f458dc5b-9pmhb   1/1     Running   0          108s   10.244.242.69    nodepool-a-95e9c8e86208   <none>           <none>
nginx-8f458dc5b-mlkwd   1/1     Running   0          47m    10.244.230.199   nodepool-a-11aa1dc199fa   <none>           <none>
nginx-8f458dc5b-r2pcp   1/1     Running   0          108s   10.244.242.70    nodepool-a-95e9c8e86208   <none>           <none>
nginx-8f458dc5b-vgwv6   1/1     Running   0          108s   10.244.242.68    nodepool-a-95e9c8e86208   <none>           <none>
nginx-8f458dc5b-x6thl   1/1     Running   0          108s   10.244.230.200   nodepool-a-11aa1dc199fa   <none>           <none>

☁  kubectl describe service nginx | grep Endpoints
Endpoints:         10.244.230.199:80,10.244.230.200:80,10.244.242.68:80 + 2 more...
You can see that scaling the pods up and down are immediately reflected in the service allowing for a single static IP to access the pods.
Types of Services
Within the Service resources there are three different types. They are as follows:
- ClusterIP
- NodePort
- LoadBalancer
These all have their own behaviors and specific uses cases so it is important to know when to use each one. In the following sections we’ll do some deeper dives into each of these.
ClusterIP
The ClusterIP is the most “basic” of the service types. It will create a static IP address that is on a separate subnet than the pod IP range, and will monitor a group of pods through label selectors.
ClusterIPs allow for pods to communicate with one another easily as pods can either send requests to the static IP or use the Kubernetes DNS to send requests to {service-name}.{namespace}. In the prior example, we deployed the DNS would have been nginx.default. There are some limitations to using ClusterIP. The biggest one being there is no way to expose this service to the outside world. This is where the service types nodePort and loadBalancer should be used.
NodePort
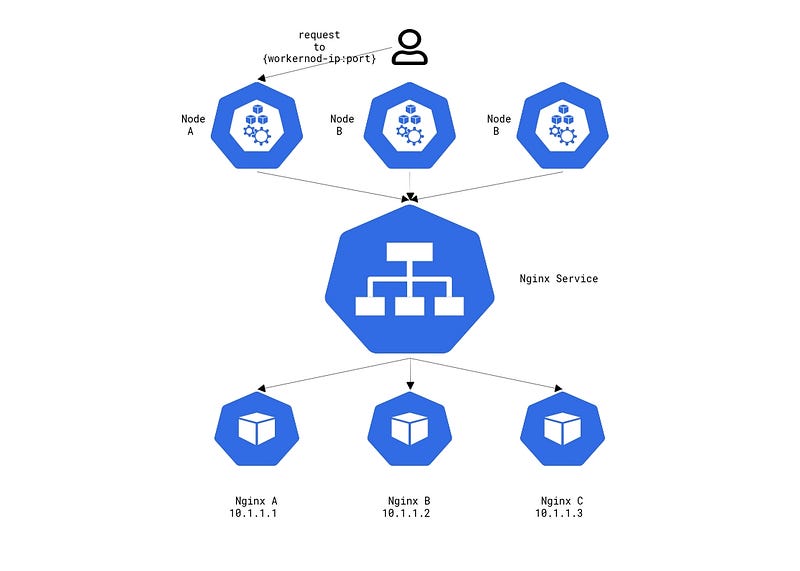
The NodePort service builds on top of the ClusterIP type. It exposes the ClusterIP to the outside world by opening a port on the worker nodes to forward traffic. This means that if you have 50 worker nodes, each worker node will listen on the assigned port even if the pods do not live on that worker node.
To create a NodePort service the only difference is to define the Type as NodePort
kind: Service
metadata:
  labels:
    app: nginx
  name: nginx
spec:
  ports:
  - name: 80-80
    port: 80
    protocol: TCP
    targetPort: 80
    # nodePort: 30001
  selector:
    app: nginx
  type: NodePort
You may notice that nodePort is commented out this is because if you do not define nodePort within the ports section, Kubernetes will automatically assign a random port from the range 30000-32767. If you wish to define a specfic port it must be done from this range.
Deploy the NodePort service manifest and have us review it.
☁  kubectl get svc
NAME         TYPE        CLUSTER-IP      EXTERNAL-IP   PORT(S)        AGE
kubernetes   ClusterIP   10.96.0.1       <none>        443/TCP        135m
nginx        NodePort    10.98.246.253   <none>        80:30828/TCP   5s

☁  kubectl describe svc nginx
Name:                     nginx
Namespace:                default
Labels:                   app=nginx
Annotations:              <none>
Selector:                 app=nginx
Type:                     NodePort
IP Family Policy:         SingleStack
IP Families:              IPv4
IP:                       10.98.246.253
IPs:                      10.98.246.253
Port:                     80-80  80/TCP
TargetPort:               80/TCP
NodePort:                 80-80  30828/TCP
Endpoints:                10.244.230.199:80,10.244.230.200:80,10.244.242.68:80 + 2 more...
Session Affinity:         None
External Traffic Policy:  Cluster
Events:                   <none>
Here we see a new field called NodePort with the value of 30828/TCP. This is the port and protocol that is assigned to this service. Now, if we were to send requests to any of our worker nodes IP address with that port, the request is sent to the service, which then is sent to our pods.
☁  kubectl get nodes -owide
NAME                      STATUS   ROLES    AGE    VERSION   INTERNAL-IP   EXTERNAL-IP     OS-IMAGE                       KERNEL-VERSION    CONTAINER-RUNTIME
nodepool-a-11aa1dc199fa   Ready    <none>   140m   v1.24.4   10.1.96.5     45.77.152.173   Debian GNU/Linux 10 (buster)   4.19.0-22-amd64   containerd://1.6.8
nodepool-a-95e9c8e86208   Ready    <none>   140m   v1.24.4   10.1.96.4     140.82.44.105   Debian GNU/Linux 10 (buster)   4.19.0-22-amd64   containerd://1.6.8
☁  curl 140.82.44.105:30828
<!DOCTYPE html>
<html>
<head>
<title>Welcome to nginx!</title>

☁  curl 45.77.152.173:30828
<!DOCTYPE html>
<html>
<head>
<title>Welcome to nginx!</title>
While this is a useful way to expose our services to the outside world, it doesn’t scale well. In a highly auto-scaling Kubernetes cluster worker nodes may be ephemeral, as they may be constantly being spun up and down. This leaves us in a similar problem we have with pods where we can find out what the IPs are, but that doesn’t mean they will always be there. If you require a static external IP address for your services, then the LoadBalancer service type will fit that need.
LoadBalancer
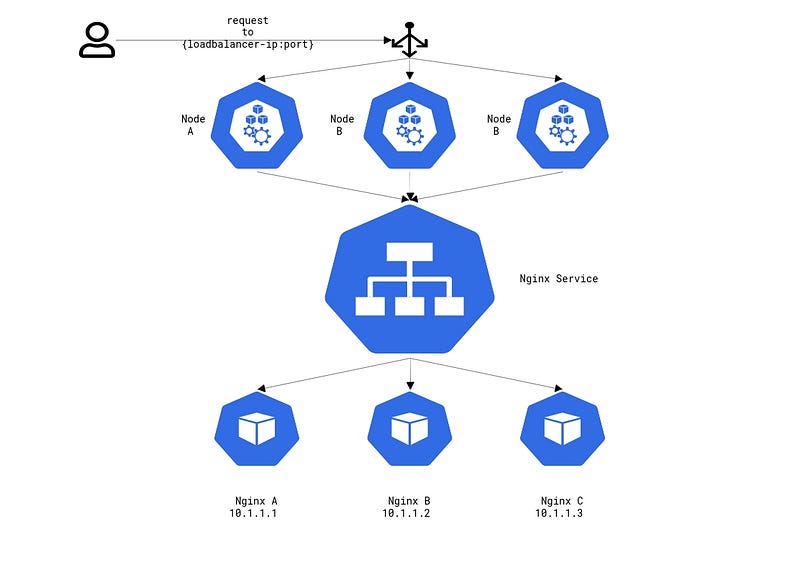
Similarly to how NodePort builds on top of ClusterIP, the LoadBalancer service builds on top of NodePort. With the LoadBalancer service, each worker node continues to have a unique port that is assigned to the specific service. However, now a L4 is deployed and configured to route to the specific worker nodes and ports. A high level request flow is as follows: a request is sent to the Load Balancer, this is forwarded to a worker node on the specific nodeport, which then gets passed to the specific service and finally sent to a pod.
Note: The load balancer that is deployed is dependent on the cloud provider you are running Kubernetes on.
Configuring a LoadBalancer service is a bit more invovled if needed. A very simple configuration can be as follows with just the type field being changed to LoadBalancer.
apiVersion: v1
kind: Service
metadata:
  labels:
    app: nginx
  name: nginx
spec:
  ports:
  - name: 80-80
    port: 80
    protocol: TCP
    targetPort: 80
  selector:
    app: nginx
  type: LoadBalancer
For example, if you wish to change your Load Balancer to force SSL redirect, configure firewall rules, to use HTTPS instead of HTTP, or to use a different balancing algorithm, then this will require defining Annotations on your service.
Here is one such example LoadBalancer manifest using Vultrs Load Balancer integration.
apiVersion: v1
kind: Service
metadata:
  annotations:
    service.beta.kubernetes.io/vultr-loadbalancer-protocol: "http"
    service.beta.kubernetes.io/vultr-loadbalancer-https-ports: "443"
    # You will need to have created a TLS Secret and pass in the name as the value
    service.beta.kubernetes.io/vultr-loadbalancer-ssl: "ssl-secret"
    service.beta.kubernetes.io/vultr-loadbalancer-algorithm: "least_connections"
    service.beta.kubernetes.io/vultr-loadbalancer-ssl-redirect: "true"
    service.beta.kubernetes.io/vultr-loadbalancer-firewall-rules: "0.0.0.0/80;0.0.0.0/443"
  labels:
    app: nginx
  name: nginx
spec:
  ports:
    - port: 80
      name: "http"
    - port: 443
      name: "https"
  selector:
    app: nginx
  type: LoadBalancer
A list of all available annotations that can be used with Vultr Load Balancers can be found here. Please check your specific cloud provider for configuration options.
When you first deploy your LoadBalancer service you will see that the EXTERNAL-IP section is pending
☁  kubectl get svc
NAME         TYPE           CLUSTER-IP       EXTERNAL-IP   PORT(S)        AGE
kubernetes   ClusterIP      10.96.0.1        <none>        443/TCP        150m
nginx        LoadBalancer   10.103.252.120   <pending>     80:30092/TCP   4s

☁  kubectl describe service nginx
Name:                     nginx
Namespace:                default
Labels:                   app=nginx
Annotations:              <none>
Selector:                 app=nginx
Type:                     LoadBalancer
IP Family Policy:         SingleStack
IP Families:              IPv4
IP:                       10.103.252.120
IPs:                      10.103.252.120
Port:                     80-80  80/TCP
TargetPort:               80/TCP
NodePort:                 80-80  30092/TCP
Endpoints:                10.244.230.199:80,10.244.230.200:80,10.244.242.68:80 + 2 more...
Session Affinity:         None
External Traffic Policy:  Cluster
Events:
  Type     Reason                  Age               From                Message
  ----     ------                  ----              ----                -------
  Normal   EnsuringLoadBalancer    8s (x4 over 44s)  service-controller  Ensuring load balancer
  Warning  SyncLoadBalancerFailed  8s (x4 over 44s)  service-controller  Error syncing load balancer: failed to ensure load balancer: load-balancer is not yet active - current status: pending
You notice that here Kubernetes has deployed a Load Balancer and is in constant communication to check if the load balancer has been provisioned and assigned an IP.
Once the Load Balancer has been provisoned and is ready for traffic, you will see an assigned IP address in the EXTERNAL-IP field and that the LB has been “ensured”. This means Kubernetes now have control to monitor and update the Load Balancer accordingly. Also, take note that a unique nodeport is assigned.
☁  kubectl get svc
NAME         TYPE           CLUSTER-IP       EXTERNAL-IP    PORT(S)        AGE
kubernetes   ClusterIP      10.96.0.1        <none>         443/TCP        154m
nginx        LoadBalancer   10.103.252.120   45.63.15.140   80:30092/TCP   4m9s

☁  kubectl describe service nginx
Name:                     nginx
Namespace:                default
Labels:                   app=nginx
Annotations:              <none>
Selector:                 app=nginx
Type:                     LoadBalancer
IP Family Policy:         SingleStack
IP Families:              IPv4
IP:                       10.103.252.120
IPs:                      10.103.252.120
LoadBalancer Ingress:     45.63.15.140
Port:                     80-80  80/TCP
TargetPort:               80/TCP
NodePort:                 80-80  30092/TCP
Endpoints:                10.244.230.199:80,10.244.230.200:80,10.244.242.68:80 + 2 more...
Session Affinity:         None
External Traffic Policy:  Cluster
Events:
  Type     Reason                  Age                    From                Message
  ----     ------                  ----                   ----                -------
  Warning  SyncLoadBalancerFailed  2m21s (x5 over 3m37s)  service-controller  Error syncing load balancer: failed to ensure load balancer: load-balancer is not yet active - current status: pending
  Normal   EnsuringLoadBalancer    61s (x6 over 3m37s)    service-controller  Ensuring load balancer
  Normal   EnsuredLoadBalancer     60s                    service-controller  Ensured load balancer
To validate that our Load Balancer is working we can send a request to the EXTERNAL-IP which is our Load balancers public IP address.
☁ curl 45.63.15.140
<!DOCTYPE html>
<html>
<head>
<title>Welcome to nginx!</title>
You may look at the LoadBalancer service type as a fantastic solution. However, there is one drawback to them; you cannot define any kind of URL Paths which doesn’t allow for flexibility or have it route to multiple services. The LoadBalancer service is tied to a single service, so if you want to expose another application from your cluster you would deploy another Load Balancer which can add quickly add up in cost if you have multiple applications.
The solution to this problem is not another service type but a different Kubernetes resource called ingress.
Ingress
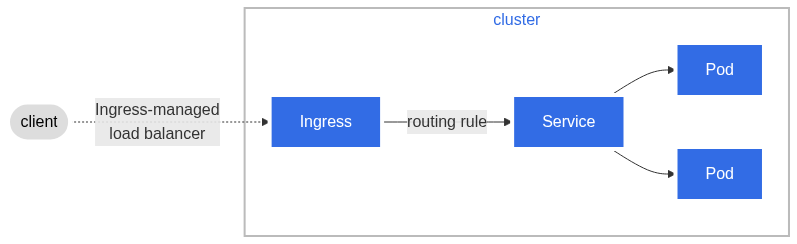
An ingress resource is a much more flexible way to define your services to be reached by the outside world. One of the biggest selling points here is you can define a single ingress resource and have this route to all of your services under subdomains, ports, or URL paths that you define. They also offer a plethora of other features, such as rate-limiting, authentication, automatic TLS, weighted routing, and much more. All of this can be done with a single load balancer as the Ingress resource works with the LoadBalancer service type the only difference being the deploy load balancer acts as a proxy to send all traffic to the Ingress resource which acts as an L7 load balancer within the cluster.
The only cavaet here is that Kubernetes does not come with an in house ingress controller. There are various ingress controllers out there, all with varying types of features. Ulitmately, this falls unto your needs and wants before deciding which ingress controller to install. Refer to the ingress controllers’ documentation for configuration guides.
Some of the more popular Ingress controllers are:
Wrapping up
While this post may give you a good understanding of the different types of Kubernetes Services and Ingress controllers this just scratched the service. There are many more configuration options for these services along with some complimentary features such as network policies. I encourage you to check out some of the links listed below for more information.
Some useful links: